Pages

Sunday, March 4, 2012

Sausage, Kale, and White Bean Soup

Wow, what an incredibly easy meal this is! I have seen similar soups to this one while out at restaurants and honestly, I never really paid much attention to them. They seem perfectly fine, but nothing too exciting. Well, I should have paid more attention to them! This soup is very versatile - just use whatever stock, green, sausage, and bean you have on hand. For the sausage use whatever kind you like best - next time I will try making this with hot Italian sausage for a little kick. You could use kale or any other green in this such as spinach, escarole, or beet greens, and for the beans use whatever you have in your pantry! The meaty sausage pairs so well with the creamy canellini beans and fresh kale to make a hearty soup that comes together in minutes, so give this soup a try! Enjoy :o)


Sausage, Kale, and White Bean Soup
Serves 4

Ingredients
1 tbsp. olive oil
1/2 lb. sausage (casings removed)
1/2 small onion, chopped
1 clove garlic, minced
1 quart low sodium chicken or beef stock
3 cups (packed) chopped kale
1 can of canellini beans, drained and rinsed
pinch of cayenne pepper
salt and pepper to taste

Directions
In a large pot, heat the olive oil over medium high heat. Add the sausage and use a wooden spoon to crumble it as it browns. Once the sausage is brown, add the onions and garlic and cook until the onions begin to soften, about 3 minutes. Add the kale, beans, and stock and bring to a boil. Add the cayenne and season to taste with salt and pepper. Allow the soup to simmer for about 5-10 minutes to blend the flavors, then serve. Yum!

Saturday, March 3, 2012

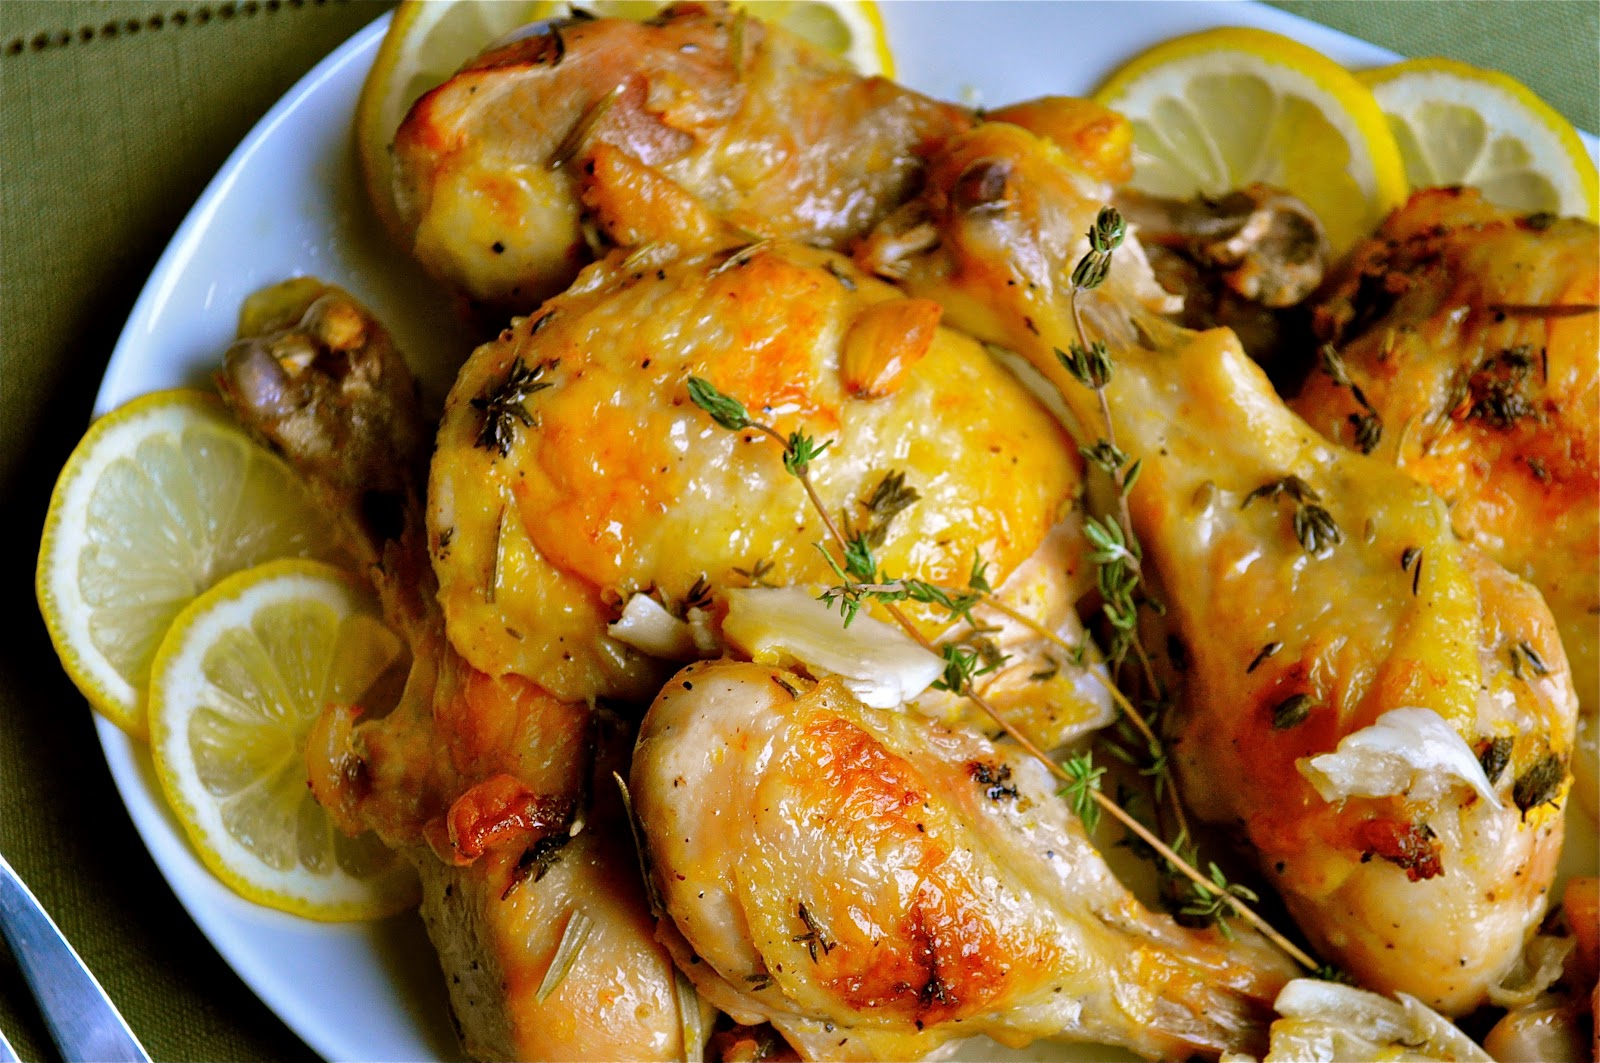
Roasted Lemon Herb Chicken

Growing up, my mother frequently made us rosemary chicken for dinner. That's all she called it... rosemary chicken. It was simple, yet oh-so-delicious and fall off the bone tender! She used chicken drumsticks and pan roasted them on the stovetop with oil, butter, and rosemary, and that was pretty much it. No fancy frills, no time-consuming preparation, and best of all it only made one pan dirty! I have been playing around with making roast chickens lately, but they always cost more than just buying one of those pre-roasted chickens at the grocery store so it was hard to justify all that effort for a more-costly end result that wasn't all that much better. I decided it was time to change my plan. Inspired by Mom's rosemary chicken, as well as the frequent sales and great bargains I see on chicken drumsticks and thighs, I decided to roast only dark meat pieces of chicken that would be flavored with rosemary. Feeling the need to put my own "twist" on it (you must be used to that by now, Mom! Nothing personal, it's just how I roll) I decided to add some of my other favorite chicken flavor combinations that I enjoy such as lemon and garlic. I also know that thyme pairs incredibly well with chicken, so I threw that in there too for good measure. To reduce my efforts in the cooking process itself, I decided that roasting the chicken in the oven instead of babysitting it on the stove would be the way for me to go. The end result is supremely flavored chicken that is juicy and tender. If you're looking for a new chicken recipe to add to the rotation, give this one a try. Enjoy! :o)

Roasted Lemon Herb Chicken
Makes 2-4 servings

Ingredients
2-3 pounds of chicken drumsticks or thighs (bone-in, skin on)
zest of 2 lemons
juice of 2 lemons (about 1/3 cup)
4 garlic cloves, peeled and smashed
3 sprigs of thyme, leaves stripped off (about 1 tbsp.)
1 sprig of rosemary, leaves stripped off (about 1 tbsp.)
1 tsp. kosher salt
1/2 tsp. black pepper
2 tbsp. butter, melted

Directions:
In a large resealable plastic bag, mix together the lemon zest, juice, garlic, herbs, salt and pepper. Add the chicken and seal the bag, then turn to coat everything in the marinade. Refrigerate and let marinate for at least 2 hours or overnight.

Preheat the oven to 425 degrees. Line a 13x9 baking pan with parchment paper (I found aluminum foil reacted with the lemon juice in an unpleasant way. If you don't have parchment, just spray the pan well and hope it doesn't stick!). Arrange the chicken in the pan, skin side up, with a little space between each piece if possible. Brush the chicken with the melted butter. Roast for 15 minutes. Remove from the oven and pour the remaining marinade over the chicken to baste, then continue roasting for about 40 minutes or until the chicken is browned and cooked through.

Let rest for 10 minutes or so before serving. Yum!

Inspired by: Mom :o)

Monday, February 20, 2012

Mongolian Beef

I love P.F. Changs. There, I said it. There's something about that place that keeps drawing me back in, and I'm not afraid to admit it. However, in my quest to avoid take-out or processed foods as much as possible, I decided it would be a good challenge to try to make some of my restaurant favorites at home. I have already conquered chicken lettuce wraps, so next I decided to try Mongolian Beef which is one of Andy's go-to meals at P.F. Changs. Beef strips are stir-fried until slightly crispy, and then they are coated in a sweet, salty, and sticky sauce and the whole combination is served over fluffy rice. This is a very delicious meal, and while it's not the healthiest thing I've ever made, it saved us a few bucks to make at home. Mongolian Beef will be added to list of recipes to make again and again (though maybe not for another 12 months!). Yum!
Mongolian Beef
Serves 2-4

Ingredients
4 tsp. vegetable oil
2 tsp. ginger, minced or grated
2 tbsp. garlic, minced or grated
1 cup low sodium soy sauce
1 cup brown sugar, packed 
1 cup water
1 tbsp. cornstarch

1 cup vegetable oil
2 lb. flank steak
1/2 cup cornstarch
3 green onions, chopped

Cooked rice, for serving

Directions:
Make the sauce: In a small saucepan, heat the 4 tsp. of vegetable oil over medium heat. Add the garlic and ginger and sautee for 1 minute until fragrant (be careful not to burn). Add the soy sauce and brown sugar and bring the sauce to a simmer.  In a measuring cup, whisk together the water and 1 tbsp. cornstarch. Once the sauce has simmered for about 5-8 minutes, whisk in the water/cornstarch and return to a simmer to thicken slightly. Remove the sauce from the heat and set aside. 

Make the beef: Tilt your knife on a 45 degree angle and cut slices about 1/4 inch thick (against the grain). Coat the steak slices in cornstarch and shake to remove all excess. Lay the slices out on a cutting board and allow to sit for about 10 minutes to allow the cornstarch to set to the meat.

Heat the vegetable oil in a medium skillet until it just begins to shimmer. Working in batches, fry the beef (carefully) until it gets brown around the edges, about 2 minutes per side. Remove the beef to a paper towel lined plate and continue working in batches until all the beef is cooked. Dump all of the oil out of the skillet and return all of the beef to the pan. Add the sauce and sliced green onions and cook over medium low heat until the sauce has coated and everything is heated through. Serve over cooked rice. Yum!

Sunday, February 19, 2012

Greek Quesadillas

Thanks to Pinterest (my newest obsession) I have been discovering all types of new recipes and edible treats to try... where to begin?? Well, one particular idea that immediately made my mouth water was Greek Quesadillas. I love gyros, I love quesadillas, I love finger foods, so why haven't I thought of this before? We have come up with a wonderful version of easy-to-make lamb gyros, so I used that when making my own version of these Greek quesadillas. I think that these would be perfect for entertaining, tailgating, or for a crowd-pleasing appetizer. The best part is that each component can be made ahead of time (the tzatziki is better the next day, anyways) and then assembled and cooked right before serving. Rich and crispy lamb, cool tzatziki, and fresh crunchy vegetables come together for a delicious fusion meal. Yum!

Greek Quesadillas
Makes 4-6

Ingredients:

Tzatziki
1/2 english cucumber
1/2 tbsp. salt
6 oz. greek yogurt
2 oz. crumbled feta
1/2 tsp. garlic powder

Lamb
1 tbsp. olive oil
2 lbs. ground lamb
salt and pepper, to taste
1/2 red onion, minced
1 tsp. dried oregano
4 cloves garlic, minced
2 tbsp. tomato paste
4 tbsp. dry red wine

Assembly
1 tomato, seeded and chopped fine
1/2 red onion, chopped fine
1/2 cucumber, chopped fine
flour tortillas
shredded mozzarella cheese

Make the tzatziki: using a box grater, shred the cucumber on the side with the largest holes. Put cucumber in a strainer over a bowl and sprinkle with the salt. Allow to sit for 10-15 minutes to draw some of the water out of the cucumber. After 10-15 minutes, rinse and squeeze out the cucumber to remove as much liquid as possible. In a small bowl, mix together the cucumber, yogurt, feta, and garlic. Cover and refrigerate until you are ready to eat (the flavors blend really well after a day or so, but it's still really good right after you make it).

Make the lamb: In a large skillet, heat the oil over medium high heat. Add the lamb and stir frequently to break apart the meat. Season with salt and pepper. Continue cooking and stirring for 8-10 minutes or until the lamb is getting brown and crispy, and most of the liquid has evaporated. Add the onions, garlic, and oregano and continue cooking for 5 minutes or until the onions have softened. Add the tomato paste and stir to coat the meat. Add the red wine and continue to cook until all of the liquid has evaporated.

To assemble the quesadillas: Preheat a nonstick pan or panini press. Sprinkle a little mozzarella cheese on 1/2 of a tortilla. Layer some of the lamb on top of the cheese (it depends on the size of the tortilla, but I was able to make 6 quesadillas with the size I used). Sprinkle on some diced cucumber, tomato, and onion, then top with a little more mozzarella cheese for the glue. Fold over the tortilla and cook in a panini press or in a nonstick skillet until golden brown and the cheese is melty. Slice into wedges and serve with the tzatziki for dipping. Enjoy! :o)

Saturday, February 18, 2012

Mocha Cupcakes with Kahlua Frosting

If you love coffee, you'll love these cupcakes! Ok, let's be honest, even if you don't love coffee you'll probably love these cupcakes :)  Recently, it was my co-worker's birthday so I decided to make some cupcakes to celebrate. When choosing a flavor, I remembered that she always has a large iced coffee with her, so incorporating that into a cupcake seemed like a logical idea. I happened to have instant espresso powder and Kahlua lying around at home, so I spun them into something truly delicious. Make sure you use instant espresso powder for this recipe as it will dissolve nicely into the batter and frosting. Regular espresso powder will not dissolve and will be grainy... yuck.  To date, I have received more compliments on these cupcakes than anything else I have ever made, so needless to say they will be a go-to recipe for a crowd pleasing dessert! Yum :o)

Mocha Cupcakes with Kahlua Frosting
Makes about 30 cupcakes

Mocha Cupcakes - This is my go-to chocolate cupcake recipe with a twist. I added a little espresso powder to try to make a chocolate-coffee (mocha) cupcake. The end result was a cupcake with a very mild coffee flavor, but a stronger chocolate flavor. I actually liked it so much that I think I will always add a little espresso powder to all of my chocolate cakes from now on!

Ingredients
2 cups white sugar
1 3/4 cups all-purpose flour
3/4 cup cocoa powder
1 tbsp. instant espresso powder
1 1/2 tsp. baking powder
1 1/2 tsp. baking soda
1 tsp. salt
2 eggs
1 cup milk
1/2 cup vegetable oil
2 tsp. vanilla extract
1 cup boiling water

Directions:
In a large bowl, stir together the sugar, flour, cocoa, espresso, baking powder, baking soda, and salt. Add the eggs, milk, oil, and vanilla and beat with a mixer until well combined. Add the boiling water and beat carefully until combined. Batter will be very thin… it’s ok!


For cupcakes, prepare pan with liners. Fill each cup 2/3 full with batter. Bake at 350 degrees for 22-25 minutes or until a toothpick comes out clean. This should make around 30 cupcakes. (Batter could also be made into a cake by pouring into 2 9-inch round cake pans and baking for about 30-35 minutes). 

Kahlua Frosting

Ingredients: 
Frosting:
1 cup butter, softened
3 cups confectioners sugar, sifted
3 tbsp. Kahlua coffee liquor
1 tbsp hot water
1 tsp instant espresso granules
1 tsp vanilla


Directions
In a small bowl, dissolve the espresso in the hot water. Stir in the Kahlua and vanilla and set aside. Using a stand mixer or hand mixer, beat the butter in a separate bowl until light and fluffy.  Slowly beat in the confectioner’s sugar. Beat in the liquids and continue mixing until frosting is light and fluffy (you might need a little more or less sugar depending on how you pack or measure your sugar, but 3 cups worked perfectly for me).


Once the cupcakes are cooled, frost each with the Kahlua frosting. Top with a chocolate covered espresso bean (optional, but yummy!). Enjoy! :o)

Saturday, January 14, 2012

Roasted Garlic Hummus with Pita Chips

While continuing on our healthy kick for January, healthy snacks have been difficult at times. When we decided to host people at our place to watch the Patriots play, I decided that it would be a good opportunity to try hummus and accomplish 2 things - it would be a healthy snack, and I would get to cross something off my 30 by 30 list! This recipe is originally from Cook's Illustrated, but I made a few changes to suit our tastes. If you love garlic, you will love this hummus. I can't wait to try other versions using the same basic idea. Enjoy :o)


Roasted Garlic Hummus
makes approximately 2 cups

Ingredients
2 tbsp. olive oil
2 cloves garlic, peeled and sliced
1 (14 oz.) can chickpeas
¼ cup liquid from canned chickpeas
2 heads roasted garlic (*see note)
1 clove raw garlic, minced (optional)
½ tsp. salt
Pinch of cayenne pepper, to taste
3 tbsp. freshly squeezed lemon juice
6 tbsp. tahini
1 tbsp. fresh parsley, minced
pita chips for serving, recipe follows

Directions
Heat the olive oil in a small pan over medium low heat. Add the sliced garlic and cook until golden brown, about 10 minutes. Drain the garlic on paper towels and reserve the cooking oil. 

After reserving 1/4 cup of canning liquid, rinse and drain the chickpeas. In a food processor, combine the drained chickpeas, the roasted garlic, minced fresh garlic (this will make the hummus extra garlicky, so use with caution!), salt, and cayenne pepper. 

In a small bowl, combine the lemon juice and canning liquid. In another small bowl combine the tahini with the oil used to cook the sliced garlic.

With the food processor running, stream in the lemon/water mixture. Scrape down the bowl. Run the processor again and stream in the tahini/oil mixture. Scrape down the bowl and process again until smooth. 

To serve, top with the cooked sliced garlic and the chopped parsley. Serve with pita chips.

*note: to make roasted garlic, cut the top part of a whole head of garlic to expose the cloves. Drizzle with a little olive oil and wrap tightly in foil. Roast at 350 degrees for about an hour, or until the cloves are soft. Once cool enough to handle, squeeze the head of garlic to remove the roasted cloves. Discard any papery skins, and mash gently into a paste.

Pita Chips
Ingredients
1 package whole wheat pitas
2 tbsp olive oil
1/4 tsp salt
1/4 tsp garlic powder

Directions
Preheat the oven to 400. Cut the pitas into 8 wedges. Combine the remaining ingredients and brush a light coating onto the pitas. Bake for 7-8 minutes or until toasted. Serve with hummus.

Wednesday, January 11, 2012

Pumpkin Chocolate Chip Muffins

These muffins were originally from the mother of my childhood friend Julie. I remember that whenever I would go over to her house, sure enough there would be a bag of homemade pumpkin chocolate chip muffins waiting for us in the freezer. All it took was a few minutes in the microwave to warm these tasty treats up and to get the chocolate chips ooey and gooey! Julie’s mom passed along the recipe to my mom (because I raved about them so much) who later passed it to me so I can make them on my own. Ok, so these aren’t exactly the healthiest muffins you’ll ever have, but they sure are delicious! I have made this recipe a little lighter by replacing oil with applesauce, but if you prefer you can replace the applesauce in this recipe with an equal part of canola oil. The pumpkin really makes these muffins moist and delicious (we often refer to them as “muffcakes” due to their cupcake-like qualities). Bake a full batch and freeze the extras. You can microwave one each morning for breakfast or as an after-dinner treat (about 20 seconds on high). Enjoy!


Pumpkin Chocolate Chip Muffins
Yield: 15 muffins (approximately)


Ingredients

1 ½ cups flour
1 cup granulated sugar
½ tsp cinnamon
1 tsp baking powder
1 tsp baking soda
½ tsp salt
½ cup applesauce
1 cup canned pumpkin or squash (not pumpkin pie filling, just plain pumpkin – check the ingredient list, it should only say “pumpkin”!)
2 eggs
1 cup chocolate chips


Directions

Preheat the oven to 350.


In a small bowl, combine the chocolate chips and one tablespoon of the flour.


In a medium bowl, sift together the remaining flour through the salt and set aside. In a large mixing bowl, whisk together the applesauce, pumpkin, and eggs until well blended. Slowly mix in the flour mixture with a wooden spoon until well combined, being careful not to over-mix. Stir in the chocolate chips.


Bake according to the following times (it is done when a toothpick inserted in the middle comes out crumbly):

Muffins, lined with cupcake liners, ¾ full: 17-20 minutes

1 loaf pan (pumpkin bread): 45-50 minutes


Yum! :o)


Source: Carol Garmin